消息中间件
RabbitMQ 是消息中间件的一种, 消息中间件即分布式系统中完成消息的发送和接收的基础软件. 这些软件有很多, 包括 ActiveMQ ( apache 公司的), RocketMQ (阿里巴巴公司的, 现已经转让给 apache), 还有性能极高的 Kafka。
SpringBoot 系列文章
消息中间件的工作过程可以用生产者消费者模型来表示. 即生产者不断的向消息队列发送信息, 而消费者从消息队列中消费信息. 具体过程如下:
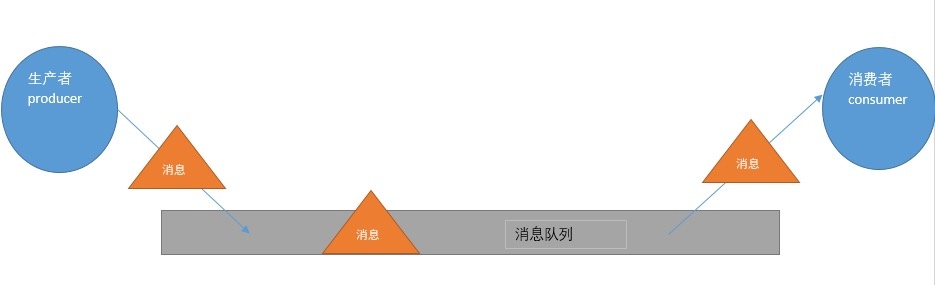
从上图可看出, 对于消息队列来说, 生产者,消息队列,消费者 是最重要的三个概念。生产者发消息到消息队列中去, 消费者监听指定的消息队列, 并且当消息队列收到消息之后, 接收消息队列传来的消息, 并且给予相应的处理. 消息队列常用于分布式系统之间互相信息的传递.
RabbitMQ 工作原理
对于 RabbitMQ 来说, 除了这三个基本模块以外, 还添加了一个模块, 即交换机(Exchange). 它使得生产者和消息队列之间产生了隔离, 生产者将消息发送给交换机,而交换机则根据调度策略把相应的消息转发给对应的消息队列. 那么 RabitMQ 的工作流程如下所示:
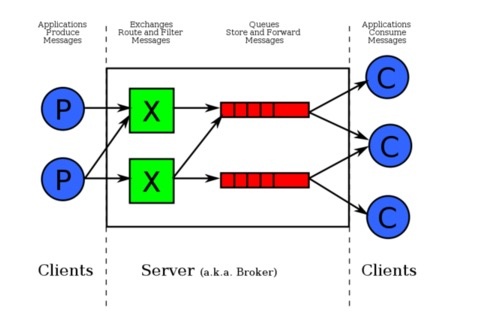
说一下交换机: 交换机的主要作用是接收相应的消息并且绑定到指定的队列. 交换机有四种类型, 分别为Direct, topic, headers, Fanout.
Direct 是 RabbitMQ 默认的交换机模式,也是最简单的模式.即创建消息队列的时候,指定一个 BindingKey. 当发送者发送消息的时候, 指定对应的 Key. 当 Key 和消息队列的 BindingKey 一致的时候,消息将会被发送到该消息队列中.
topic 转发信息主要是依据通配符, 队列和交换机的绑定主要是依据一种模式(通配符+字符串), 而当发送消息的时候, 只有指定的 Key 和该模式相匹配的时候, 消息才会被发送到该消息队列中.
headers 也是根据一个规则进行匹配, 在消息队列和交换机绑定的时候会指定一组键值对规则, 而发送消息的时候也会指定一组键值对规则, 当两组键值对规则相匹配的时候, 消息会被发送到匹配的消息队列中.
Fanout 是路由广播的形式, 将会把消息发给绑定它的全部队列, 即便设置了 key, 也会被忽略.
关注我

转载请务必注明原创地址为:http://www.54tianzhisheng.cn/2018/01/28/RabbitMQ/
SpringBoot 整合 RabbitMQ(Topic 转发模式)
在上一篇文章中,我们也将 SpringBoot 和 RabbitMQ 整合过,不过那是使用 Direct 模式,文章地址是:SpringBoot RabbitMQ 整合使用
相关文章
1、SpringBoot Kafka 整合使用
2、SpringBoot RabbitMQ 整合使用
3、SpringBoot ActiveMQ 整合使用
4、Kafka 安装及快速入门
整合
接下来,我要带大家继续整合(Topic 转发模式):
1、配置文件和 pom.xml 这些还都是一样的,我们不用再修改
2、启动类中创建 Queue 和 Exchange,并把 Queue 按照相应的规则绑定到交换机Queue 上。代码如下图:
1
2
3
4
5
6
7
8
9
10
11
12
13
14
| @Bean
public Queue queue() {
return new Queue("rpc-queue-zhisheng");
}
@Bean
public TopicExchange exchange() {
return new TopicExchange("rpc-exchange-zhisheng");
}
@Bean
public Binding binding(Queue queue, TopicExchange exchange) {
return BindingBuilder.bind(queue).to(exchange).with("rpc-zhisheng");
}
|
这里创建一个 Queue 和 Exchange ,然后绑定。
注意:上面代码中的 with(“rpc-zhisheng”) 这个 “zhisheng” 是 routingkey,RabbitMQ 将会根据这个参数去寻找有没有匹配此规则的队列,如果有,则会把消息发送给它,如果不止有一个,则会把消息分发给所有匹配的队列。
3、消息发送类
1
2
3
4
5
6
7
8
9
10
11
12
13
14
15
16
17
18
19
20
21
22
23
| package com.zhisheng.rabbitmq.rpc.client;
import org.springframework.amqp.core.TopicExchange;
import org.springframework.amqp.rabbit.core.RabbitTemplate;
import org.springframework.beans.factory.annotation.Autowired;
import org.springframework.stereotype.Component;
@Component
public class RabbitMQClient {
@Autowired
private RabbitTemplate rabbitTemplate;
@Autowired
private TopicExchange exchange;
public void send(String message) {
rabbitTemplate.convertAndSend(exchange.getName(), "rpc-zhisheng", message);
}
}
|
这里是发送消息的代码,“rpc-zhisheng” 就是上面我们设置的 routingkey。
4、消息接收端
1
2
3
4
5
6
7
8
9
10
11
12
13
14
15
16
| package com.zhisheng.rabbitmq.rpc.server;
import org.springframework.amqp.rabbit.annotation.RabbitListener;
import org.springframework.stereotype.Component;
@Component
public class RabbitMQServer {
@RabbitListener(queues = "rpc-queue-zhisheng")
public void receive(String message) {
System.out.println("--------receive ------- " + message);
}
}
|
5、启动类中注入 发送消息类,然后调用 send 方法
1
2
3
4
5
6
7
8
9
10
11
12
13
| @Autowired
private RabbitMQClient client;
@PostConstruct
public void init() {
StopWatch stopWatch = new StopWatch();
stopWatch.start();
for (int i = 0; i < 1000; i++) {
client.send(" zhisheng, --------- send " + i);
}
stopWatch.stop();
System.out.println("总共耗时:" + stopWatch.getTotalTimeMillis());
}
|
运行此 SpringBoot 项目,则可以发现结果如下:
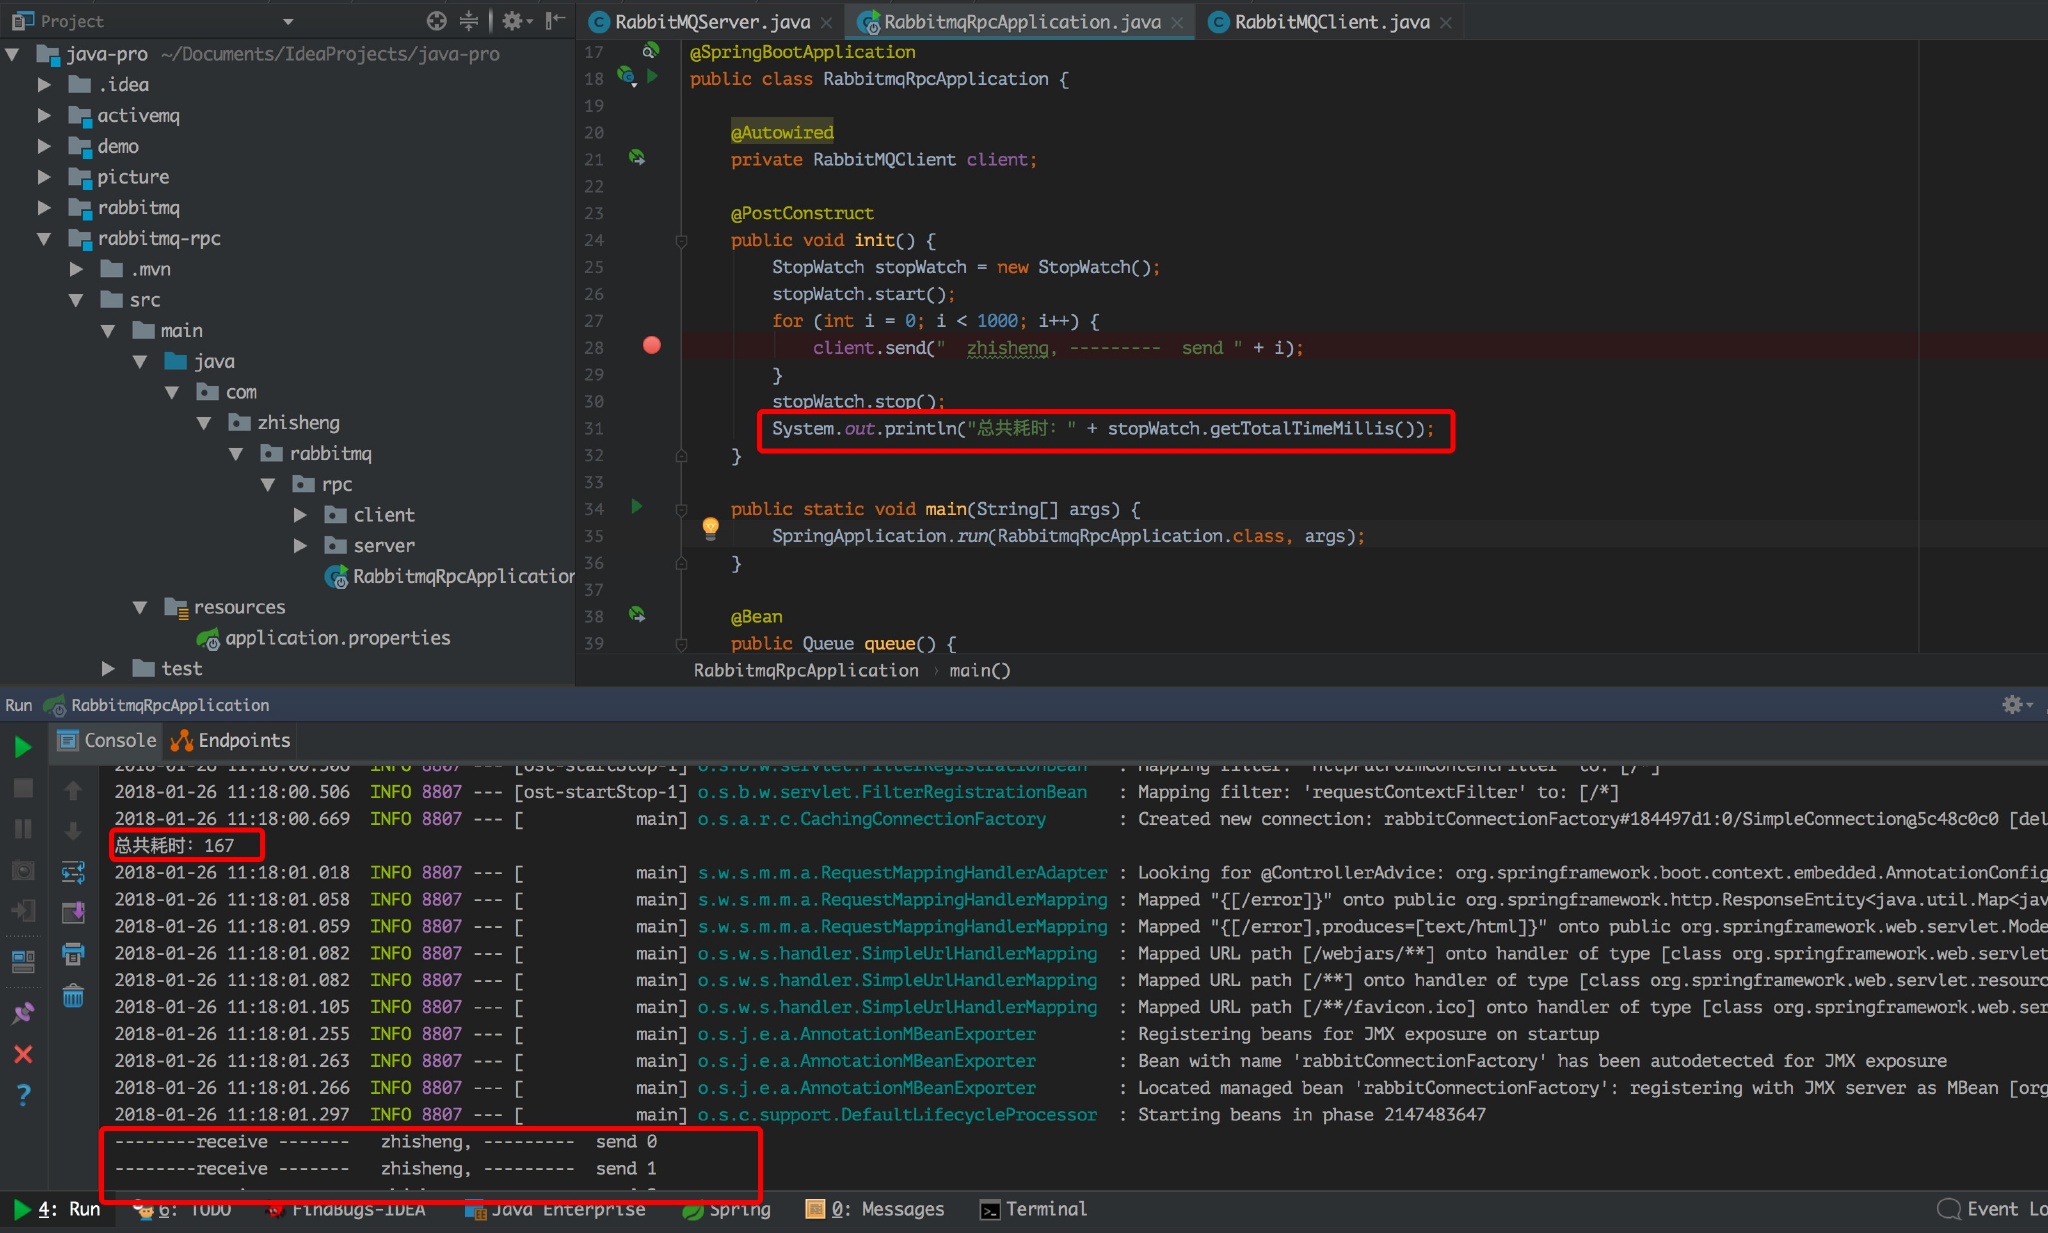
这里测试的是匹配一个消息队列的情况,感兴趣的可以测试下匹配多个消息队列的。
SpringBoot 整合 RabbitMQ( Fanout Exchange 形式)
Fanout Exchange 形式又叫广播形式。
任何发送到 Fanout Exchange 的消息都会被转发到与该 Exchange 绑定(Binding)的所有 Queue 上。
- 这种模式需要提前将 Exchange 与 Queue 进行绑定,一个 Exchange 可以绑定多个 Queue,一个 Queue 可以同多个 Exchange 进行绑定
- 这种模式不需要 RoutingKey
- 如果接受到消息的 Exchange 没有与任何 Queue 绑定,则消息会被抛弃。
1、消息发送类
1
2
3
4
5
6
7
8
9
10
11
12
13
14
15
16
17
18
19
| package com.zhisheng.rabbitmq.rpc.client;
import org.springframework.amqp.rabbit.core.RabbitTemplate;
import org.springframework.beans.factory.annotation.Autowired;
import org.springframework.stereotype.Component;
@Component
public class RabbitMQClient {
@Autowired
private RabbitTemplate rabbitTemplate;
public void send2(String message) {
rabbitTemplate.convertAndSend("fanout-exchange", "", message);
}
}
|
这里可以不设置 routingkey 了。
2、启动类
1
2
3
4
5
6
7
8
9
10
11
12
13
14
15
16
17
18
19
20
21
22
23
24
25
26
27
28
29
30
31
32
33
34
35
36
37
38
39
40
41
42
43
44
45
46
47
48
49
50
51
52
53
54
55
56
57
58
59
60
61
62
63
64
65
66
67
68
69
70
71
| package com.zhisheng.rabbitmq.rpc;
import com.zhisheng.rabbitmq.rpc.client.RabbitMQClient;
import org.springframework.amqp.core.Binding;
import org.springframework.amqp.core.BindingBuilder;
import org.springframework.amqp.core.FanoutExchange;
import org.springframework.amqp.core.Queue;
import org.springframework.amqp.support.converter.Jackson2JsonMessageConverter;
import org.springframework.beans.factory.annotation.Autowired;
import org.springframework.beans.factory.annotation.Qualifier;
import org.springframework.boot.SpringApplication;
import org.springframework.boot.autoconfigure.SpringBootApplication;
import org.springframework.context.annotation.Bean;
import javax.annotation.PostConstruct;
@SpringBootApplication
public class RabbitmqRpcApplication {
@Autowired
private RabbitMQClient client;
@PostConstruct
public void init() {
client.send2("zhisheng ++++++++++ send2 ");
}
public static void main(String[] args) {
SpringApplication.run(RabbitmqRpcApplication.class, args);
}
@Bean(name = "queue")
public Queue queue() {
return new Queue("rpc.queue");
}
@Bean(name = "queue2")
public Queue queue2() {
return new Queue("rpc.queue2");
}
@Bean(name = "queue3")
public Queue queue3() {
return new Queue("rpc.queue3");
}
@Bean
public FanoutExchange exchange() {
return new FanoutExchange("fanout-exchange");
}
@Bean
public Binding binding(@Qualifier("queue") Queue queue, FanoutExchange exchange) {
return BindingBuilder.bind(queue).to(exchange);
}
@Bean
public Binding binding2(@Qualifier("queue2") Queue queue, FanoutExchange exchange) {
return BindingBuilder.bind(queue).to(exchange);
}
@Bean
public Binding binding3(@Qualifier("queue3") Queue queue, FanoutExchange exchange) {
return BindingBuilder.bind(queue).to(exchange);
}
@Bean
public Jackson2JsonMessageConverter messageConverter() {
return new Jackson2JsonMessageConverter();
}
}
|
在启动类中我创建三个 Queue: rpc.queue, rpc.queue2 , rpc.queue3
也创建一个 FanoutExchange,并把这三个 Queue 绑定在同一个交换机 fanout-exchange 上面
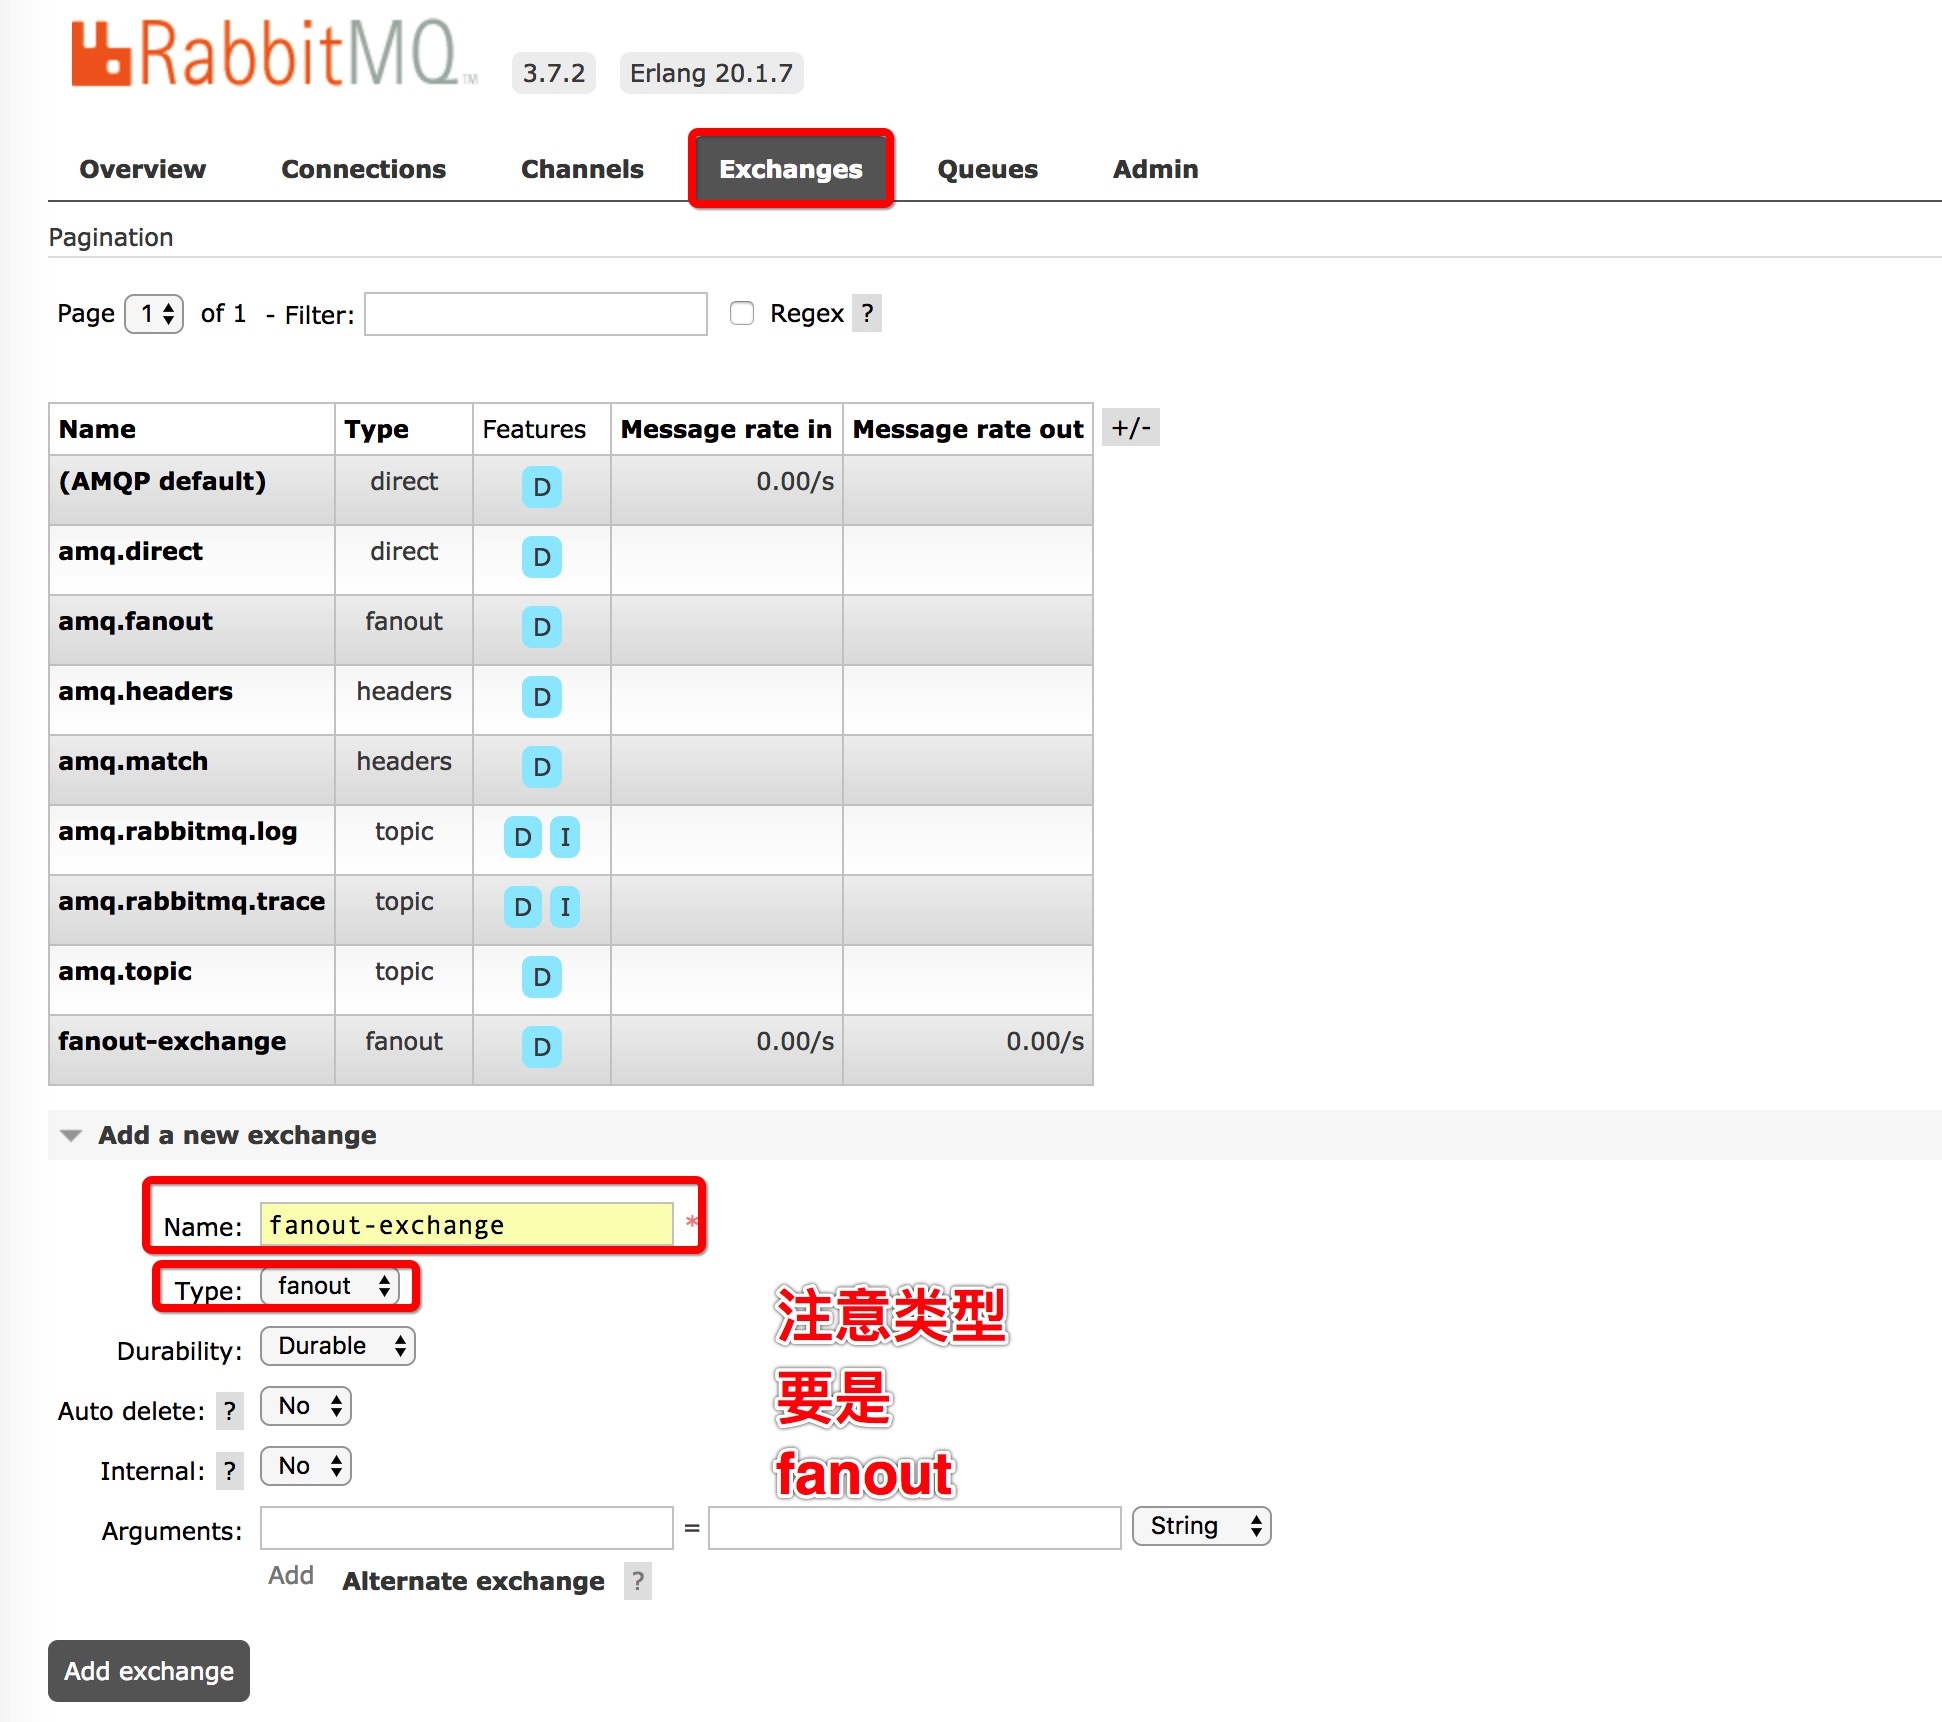
注意:这个 fanout-exchange 交换机不知为啥,我自己在应用程序里创建,运行程序会出错,下面讲讲我是怎么解决的。
我是从 RabbitMQ 管理界面直接添加个 exchange 的。
3、消息接收类
1
2
3
4
5
6
7
8
9
10
11
12
13
14
15
16
17
18
19
20
21
22
23
24
25
26
27
| package com.zhisheng.rabbitmq.rpc.server;
import org.springframework.amqp.rabbit.annotation.RabbitListener;
import org.springframework.stereotype.Component;
@Component
public class RabbitMQServer {
@RabbitListener(queues = "rpc.queue")
public void receive(String message) {
System.out.println("--------receive ------- " + message);
}
@RabbitListener(queues = "rpc.queue2")
public void receive2(String message) {
System.out.println("--------receive2 ------- " + message);
}
@RabbitListener(queues = "rpc.queue3")
public void receive3(String message) {
System.out.println("--------receive3 ------- " + message);
}
}
|
监听每个 Queue,并有一个方法输出对应接收到的消息。
4、运行项目
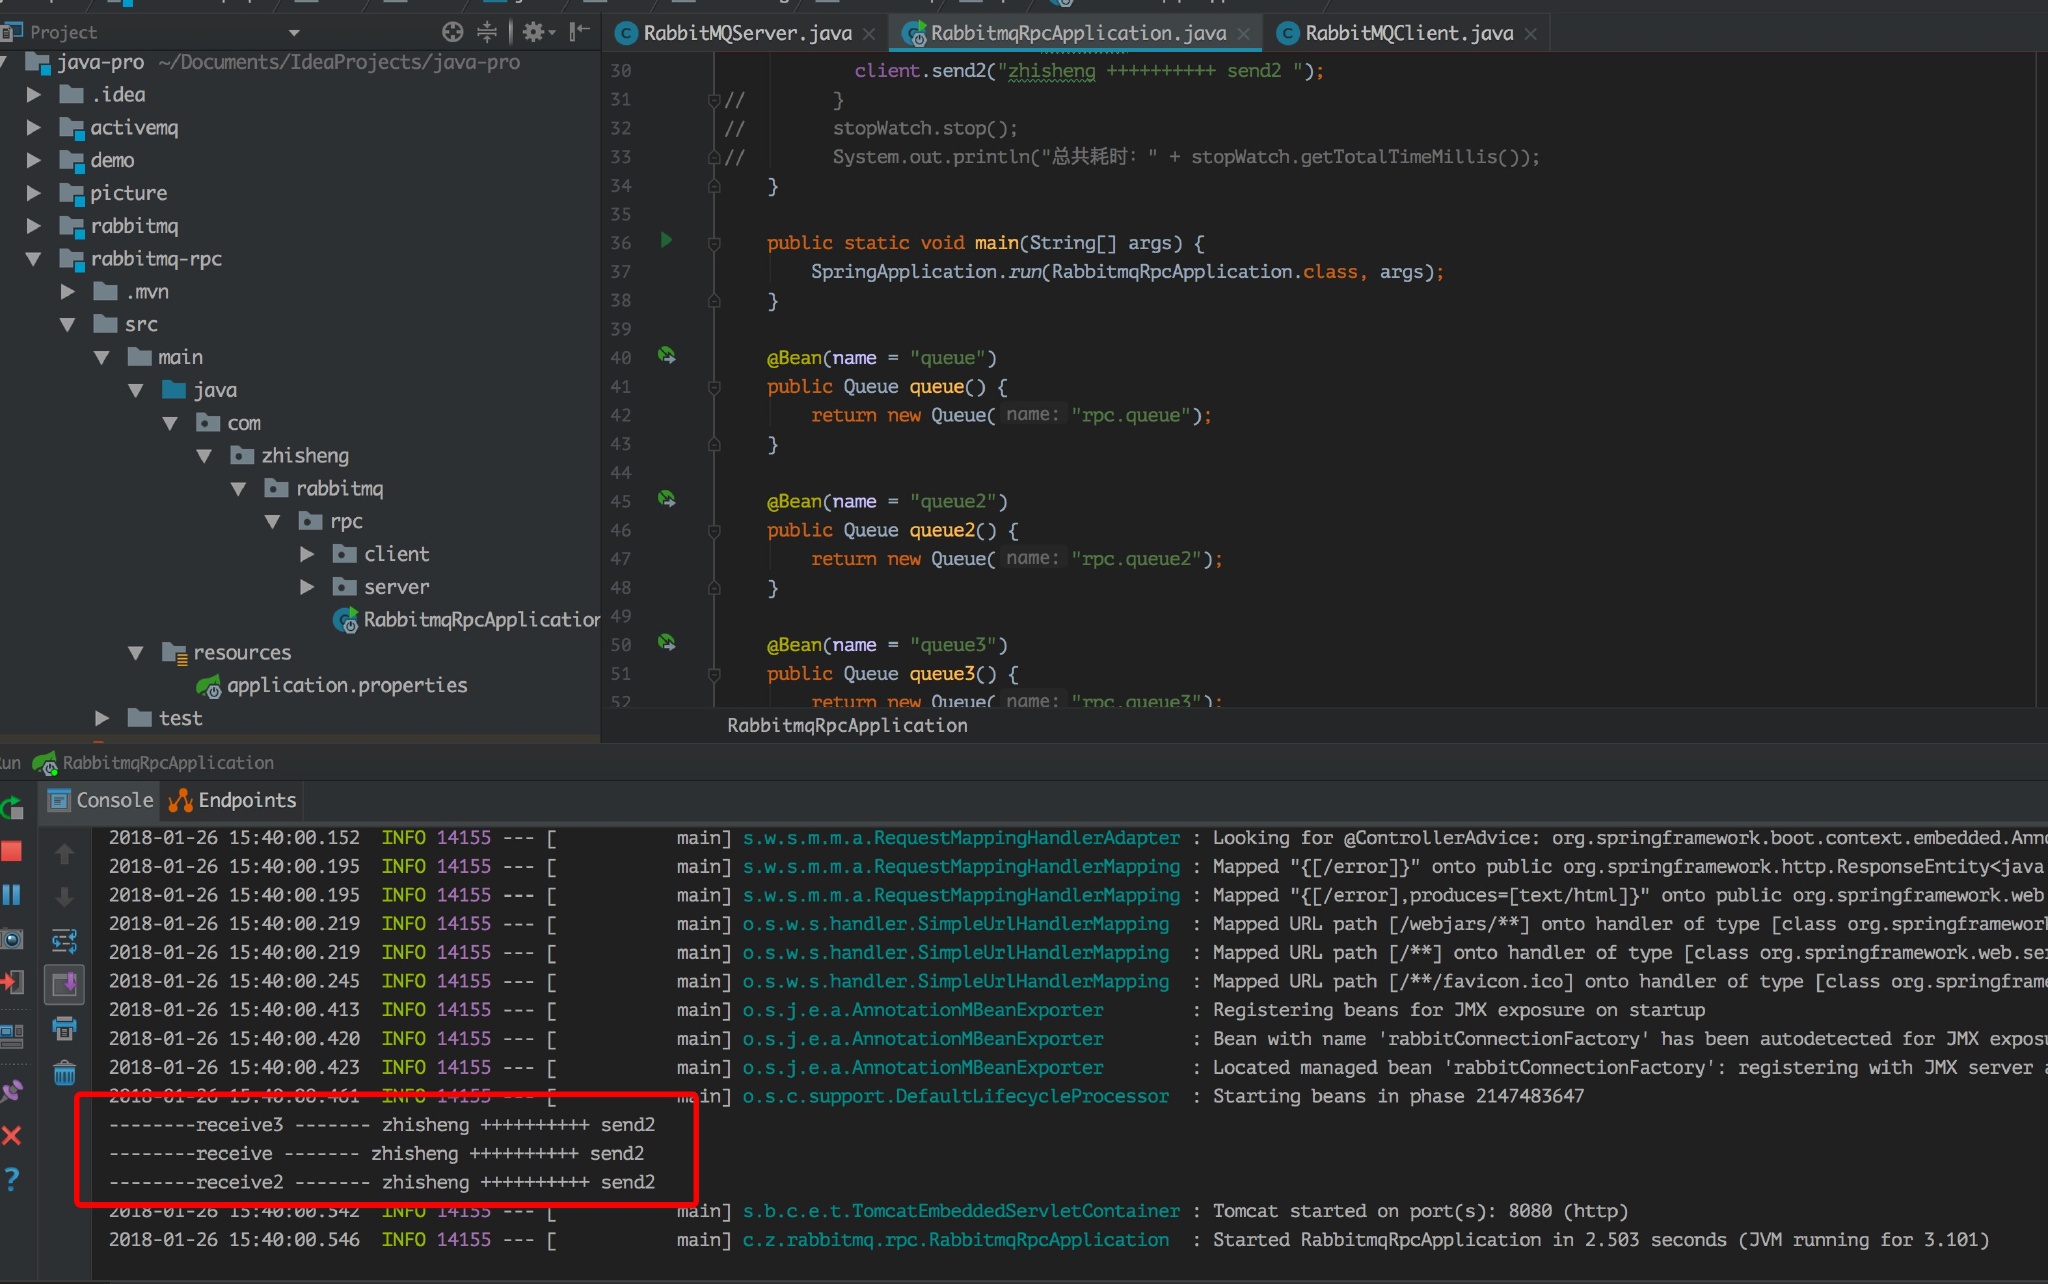
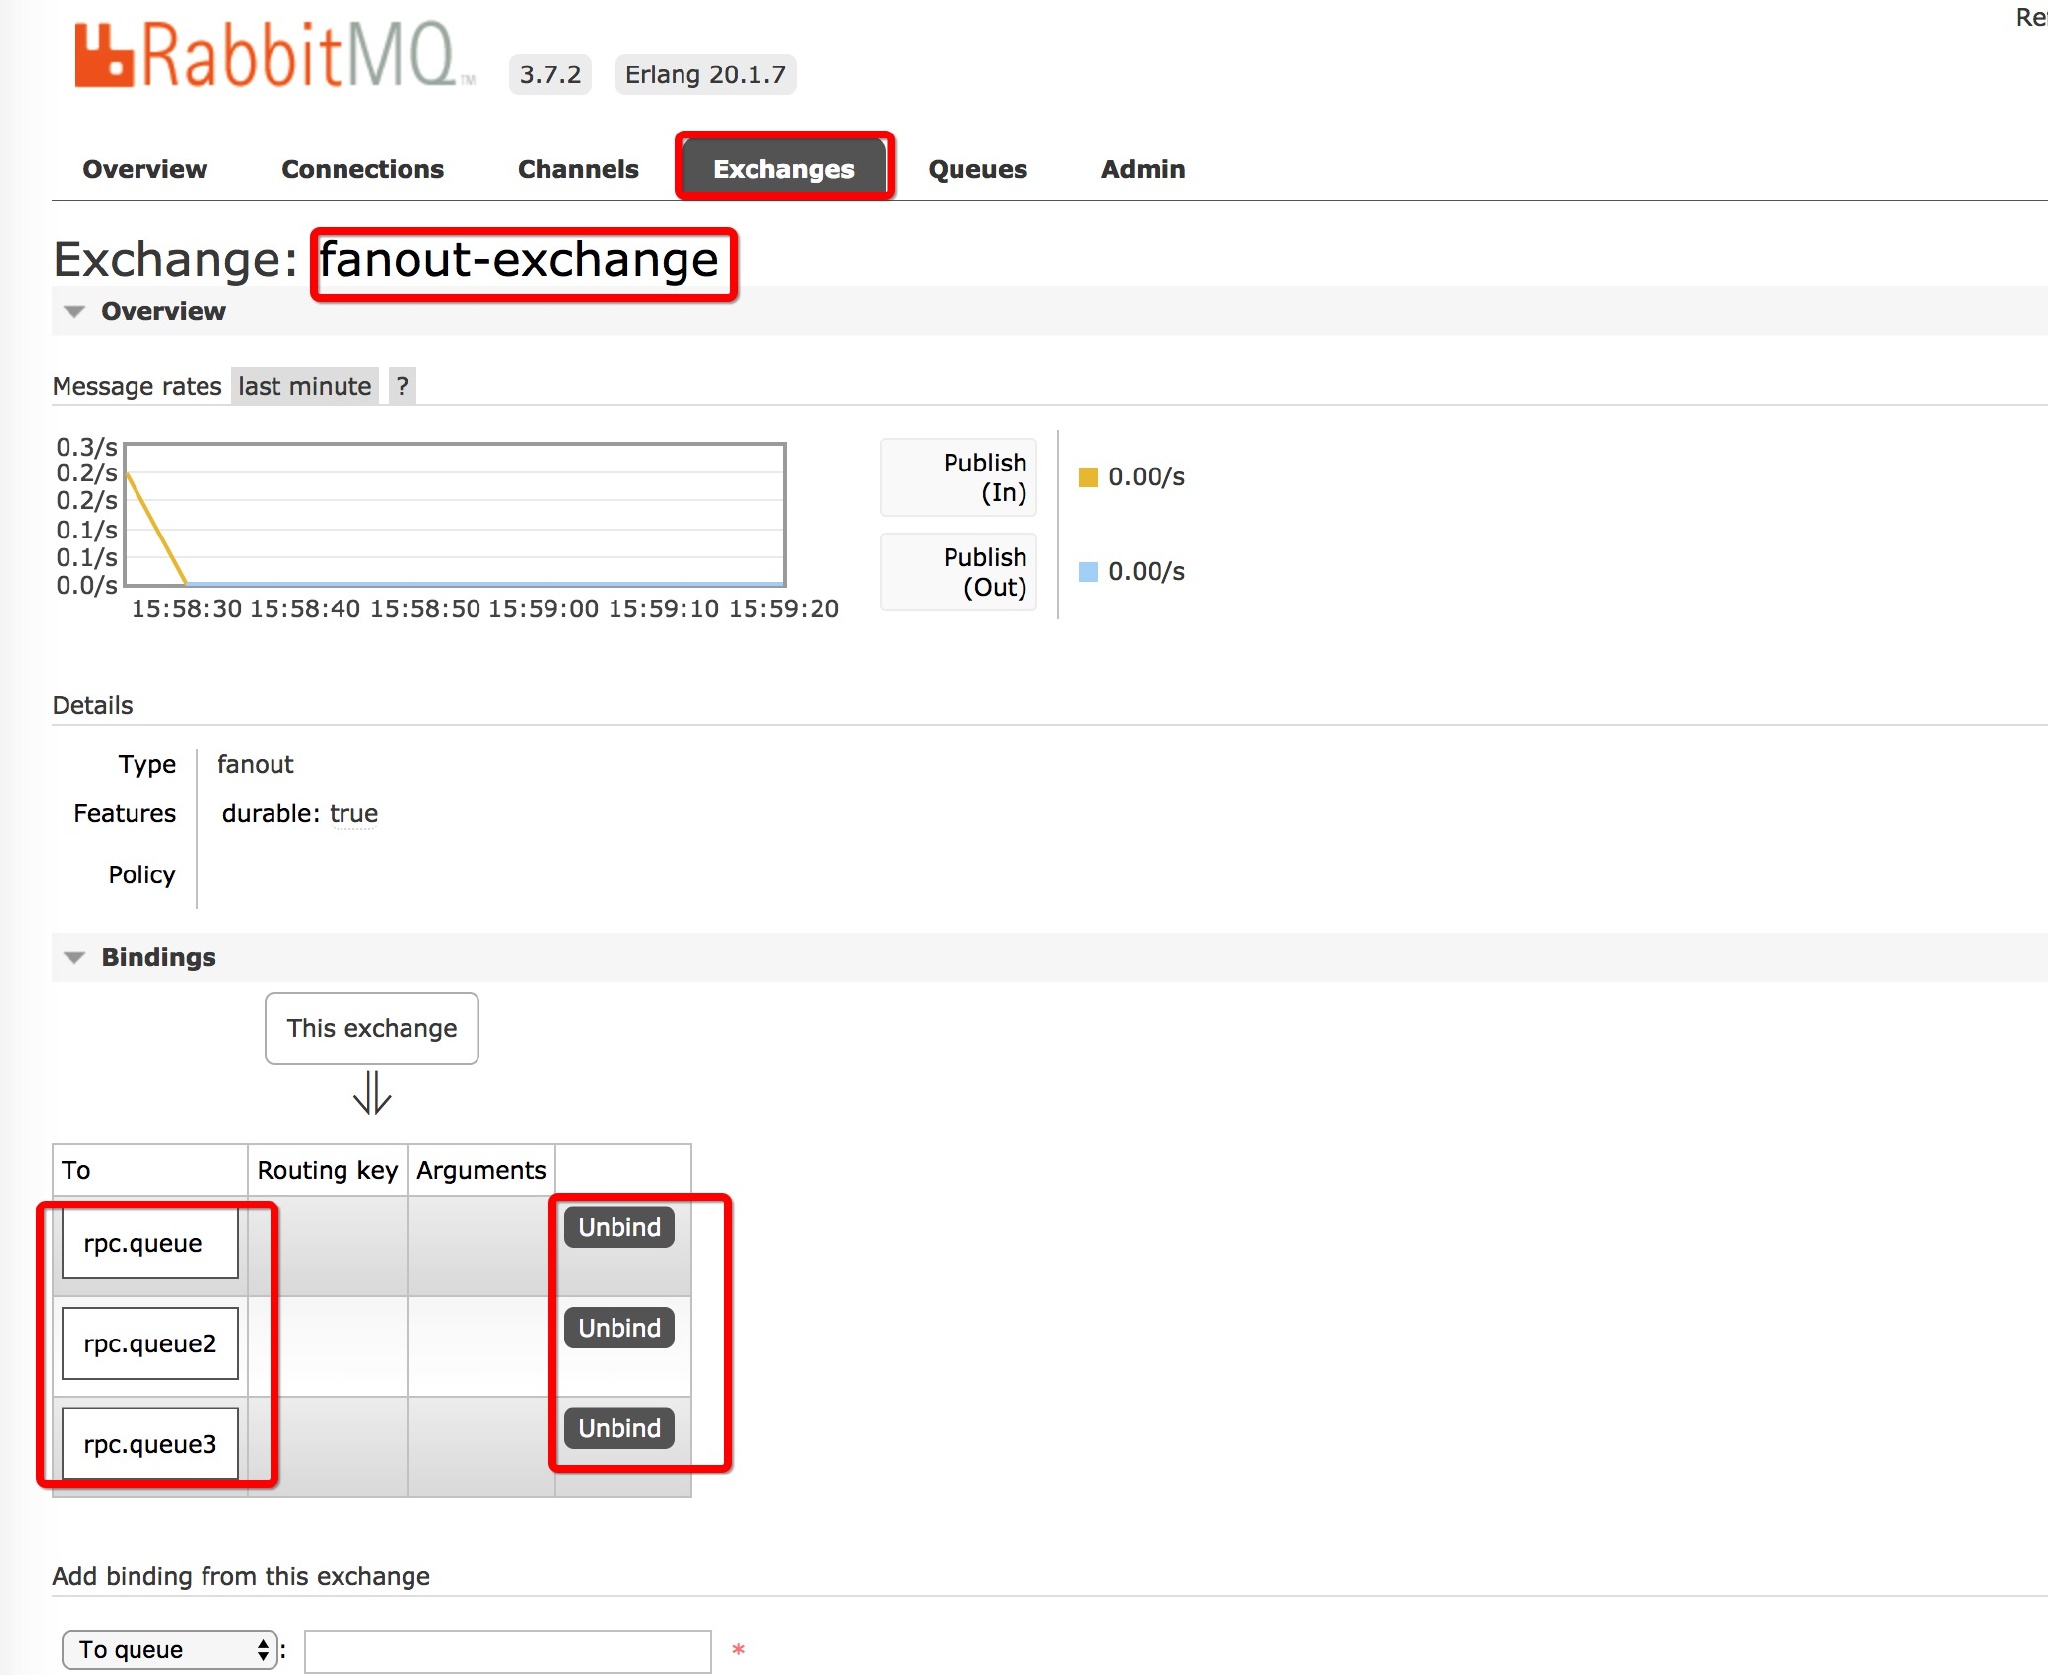
结果如上,每个队列都打印出自己收到的结果,同时我们看看这三个 Queue 是不是绑定到 Exchange 上呢?
可以看到三个 Queue 都绑定在 Exchange 上了。
总结
RabbitMQ 与 SpringBoot 整合就到这里为止了,后面如果有时间会深度研究 RabbitMQ 的。
还请继续关注我的博客:http://www.54tianzhisheng.cn/