3.8 自定义 Flink Connector
在前面文章 3.6 节中讲解了 Flink 中的 Data Source 和 Data Sink,然后介绍了 Flink 中自带的一些 Source 和 Sink 的 Connector,接着我们还有几篇实战会讲解了如何从 Kafka 处理数据写入到 Kafka、ElasticSearch 等,当然 Flink 还有一些其他的 Connector,我们这里就不一一介绍了,大家如果感兴趣的话可以去官网查看一下,如果对其代码实现比较感兴趣的话,也可以去看看其源码的实现。我们这篇文章来讲解一下如何自定义 Source 和 Sink Connector?这样我们后面再遇到什么样的需求都难不倒我们了。
3.8.1 如何自定义 Source Connector?
这里就演示一下如何自定义 Source 从 MySQL 中读取数据。
添加依赖
在 pom.xml 中添加 MySQL 依赖:
1
2
3
4
5
| <dependency>
<groupId>mysql</groupId>
<artifactId>mysql-connector-java</artifactId>
<version>5.1.34</version>
</dependency>
|
数据库建表
数据库建表的 SQL 语句如下:
1
2
3
4
5
6
7
8
| DROP TABLE IF EXISTS `student`;
CREATE TABLE `student` (
`id` int(11) unsigned NOT NULL AUTO_INCREMENT,
`name` varchar(25) COLLATE utf8_bin DEFAULT NULL,
`password` varchar(25) COLLATE utf8_bin DEFAULT NULL,
`age` int(10) DEFAULT NULL,
PRIMARY KEY (`id`)
) ENGINE=InnoDB AUTO_INCREMENT=5 DEFAULT CHARSET=utf8 COLLATE=utf8_bin;
|
数据库插入数据
往新建的数据库表中插入 4 条数据的 SQL 语句如下:
1
2
| INSERT INTO `student` VALUES ('1', 'zhisheng01', '123456', '18'), ('2', 'zhisheng02', '123', '17'), ('3', 'zhisheng03', '1234', '18'), ('4', 'zhisheng04', '12345', '16');
COMMIT;
|
新建实体类
对应数据库字段的实体类如下:
1
2
3
4
5
6
7
8
9
| @Data
@AllArgsConstructor
@NoArgsConstructor
public class Student {
public int id;
public String name;
public String password;
public int age;
}
|
自定义 Source 类
SourceFromMySQL 是自定义的 Source 类,该类继承 RichSourceFunction ,实现里面的 open、close、run、cancel 方法,它的作用是读取 MySQL 中的数据,代码如下所示。
1
2
3
4
5
6
7
8
9
10
11
12
13
14
15
16
17
18
19
20
21
22
23
24
25
26
27
28
29
30
31
32
33
34
35
36
37
38
39
40
41
42
43
44
45
46
47
48
49
50
51
52
53
54
55
56
57
58
59
60
61
62
63
64
65
66
67
68
| public class SourceFromMySQL extends RichSourceFunction<Student> {
PreparedStatement ps;
private Connection connection;
@Override
public void open(Configuration parameters) throws Exception {
super.open(parameters);
connection = getConnection();
String sql = "select * from Student;";
ps = this.connection.prepareStatement(sql);
}
@Override
public void close() throws Exception {
super.close();
if (connection != null) {
connection.close();
}
if (ps != null) {
ps.close();
}
}
@Override
public void run(SourceContext<Student> ctx) throws Exception {
ResultSet resultSet = ps.executeQuery();
while (resultSet.next()) {
Student student = new Student(
resultSet.getInt("id"),
resultSet.getString("name").trim(),
resultSet.getString("password").trim(),
resultSet.getInt("age"));
ctx.collect(student);
}
}
@Override
public void cancel() {
}
private static Connection getConnection() {
Connection con = null;
try {
Class.forName("com.mysql.jdbc.Driver");
con = DriverManager.getConnection("jdbc:mysql://localhost:3306/test?useUnicode=true&characterEncoding=UTF-8", "root", "123456");
} catch (Exception e) {
System.out.println("mysql get connection has exception , msg = " + e.getMessage());
}
return con;
}
}
|
Flink 应用程序代码
读取 MySQL 数据的代码完成后,接下来 Flink 主程序的代码就可以直接在 addSource() 方法中构造一个 SourceFromMySQL 对象作为一个参数传入,具体代码如下所示。
1
2
3
4
5
6
7
8
9
| public class Main2 {
public static void main(String[] args) throws Exception {
final StreamExecutionEnvironment env = StreamExecutionEnvironment.getExecutionEnvironment();
env.addSource(new SourceFromMySQL()).print();
env.execute("Flink add data sourc");
}
}
|
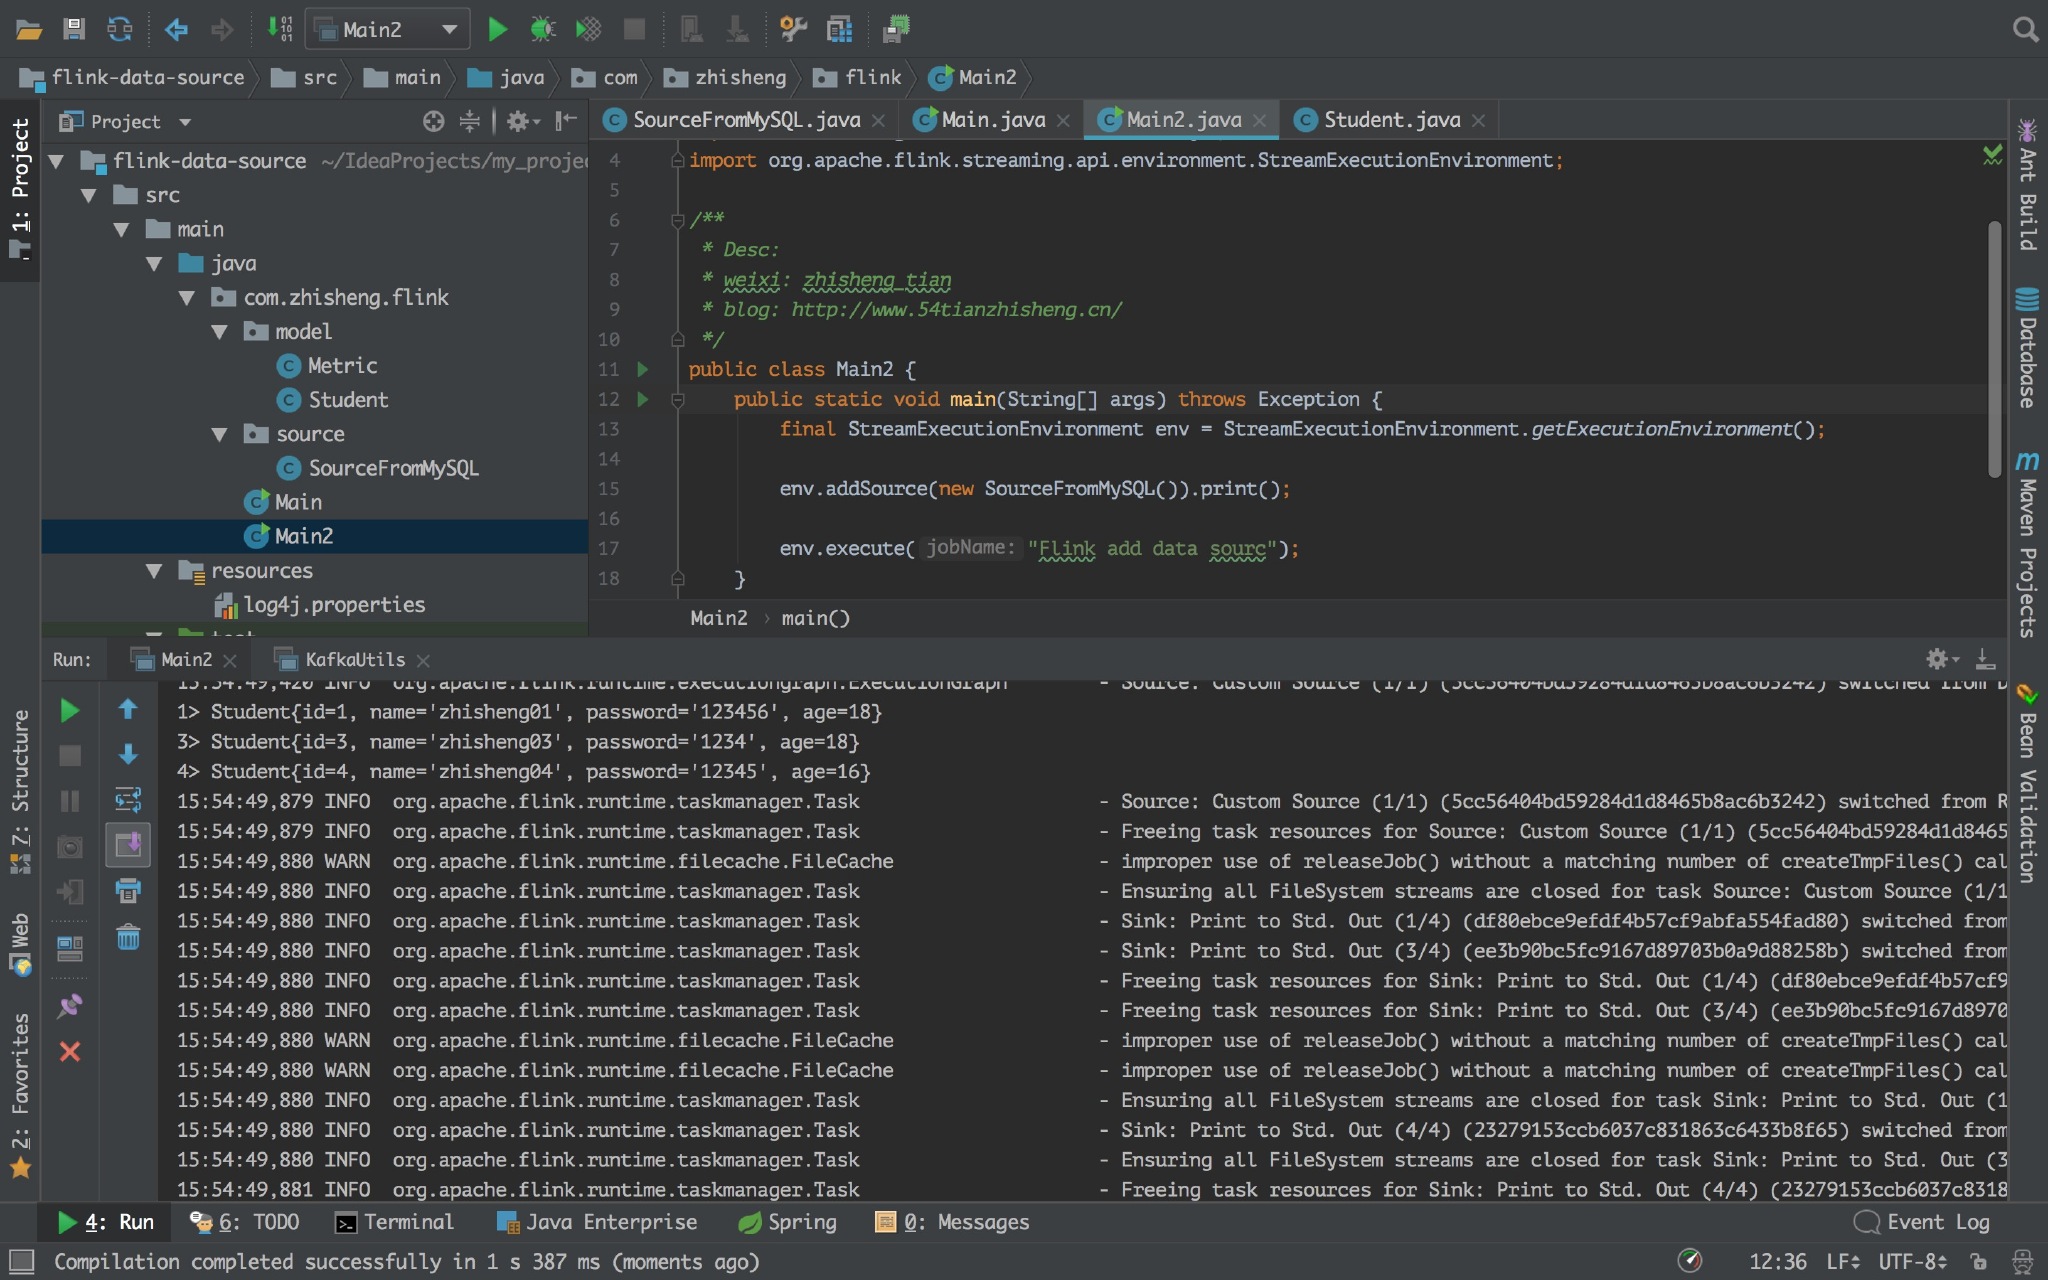
运行 Flink 程序,控制台日志中可以看见打印的 student 信息,结果如下图所示。
3.8.2 RichSourceFunction 的用法及源码分析
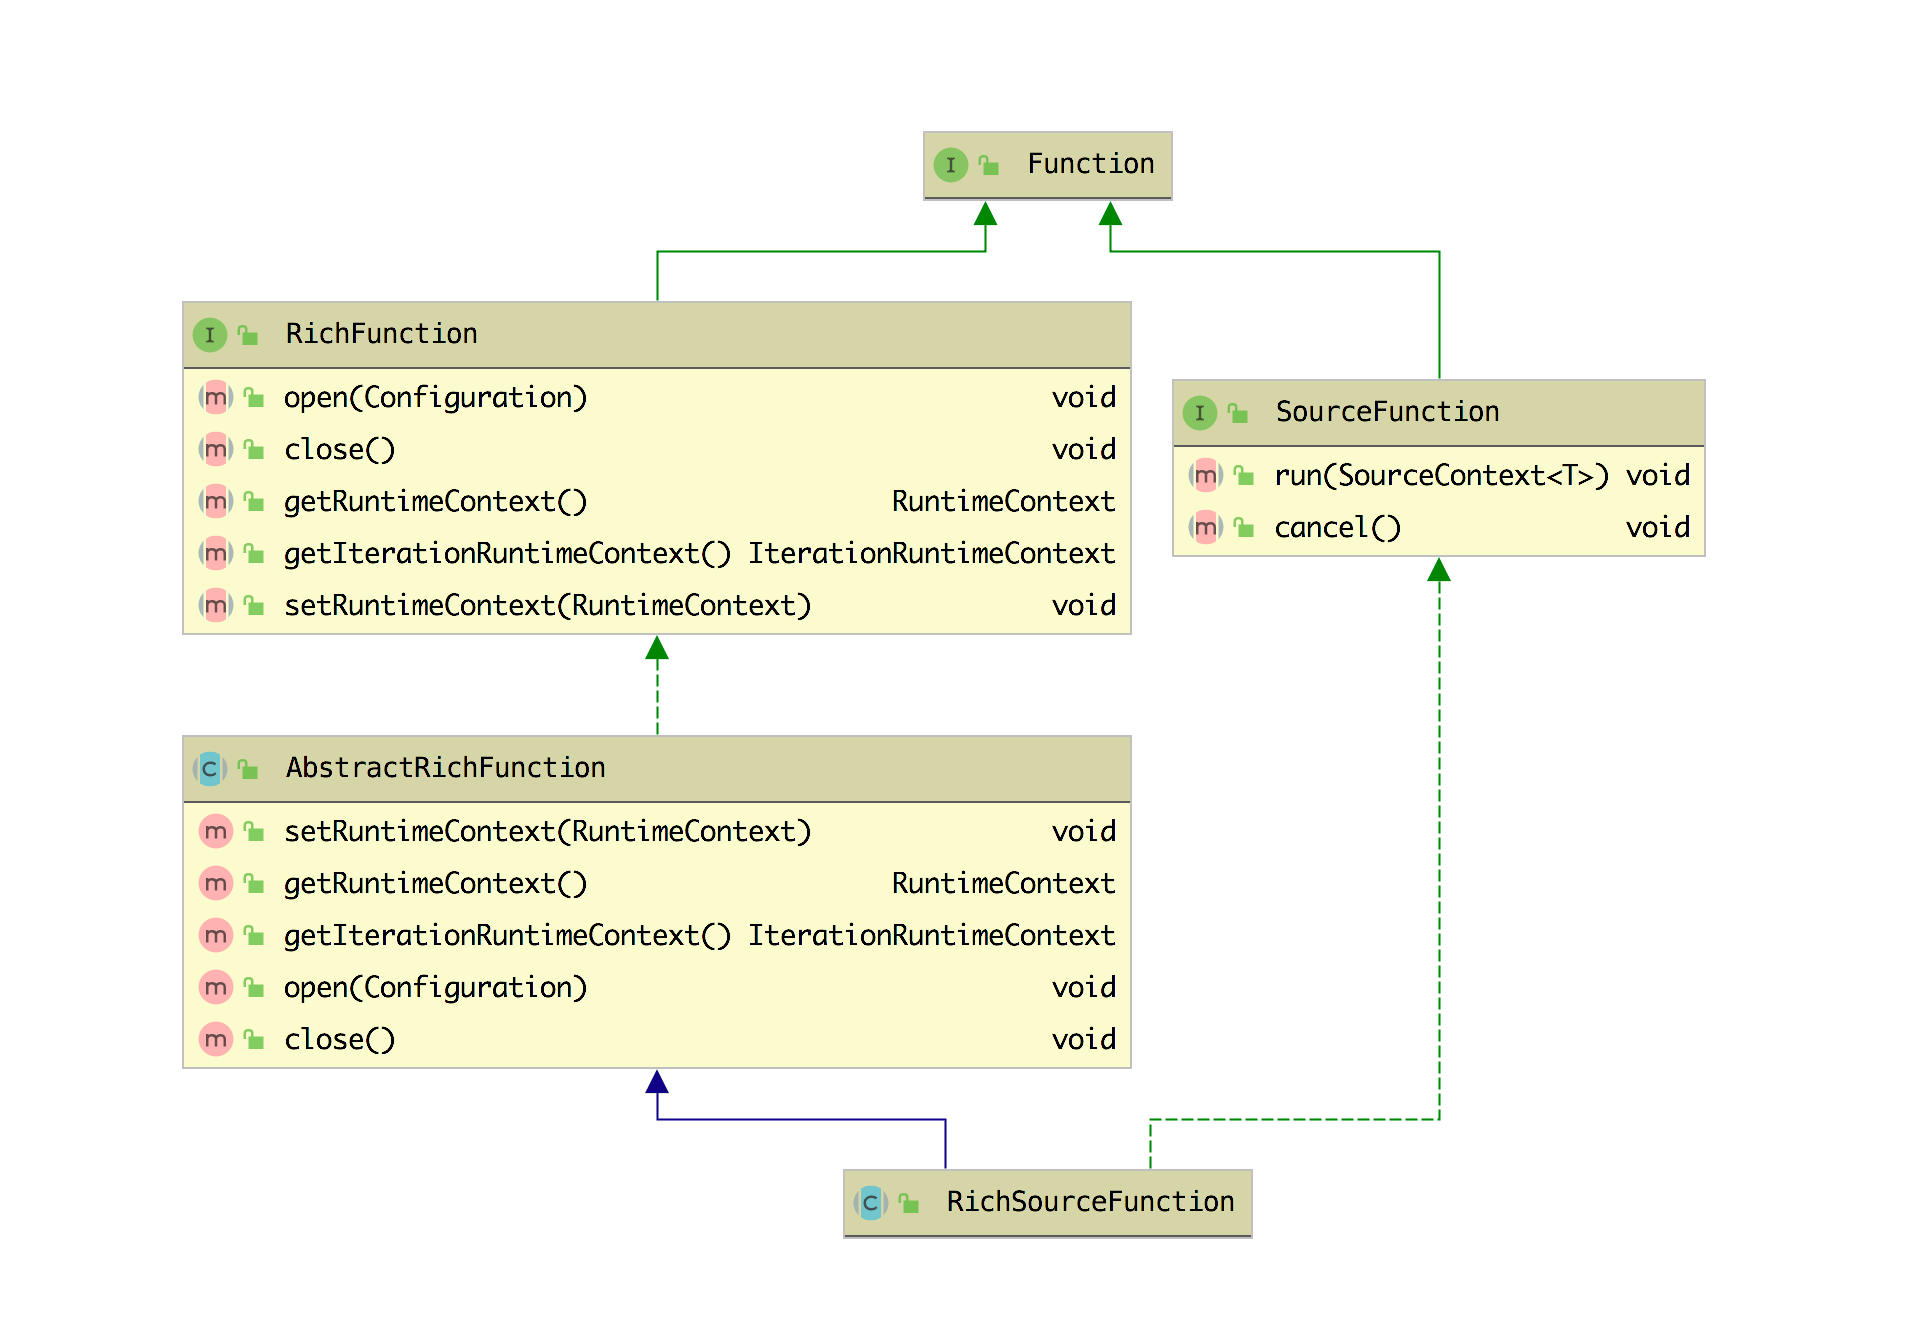
从上面自定义的 Source 可以看到我们继承的就是这个 RichSourceFunction 类,其实也是可以使用 SourceFunction 函数来自定义 Source。 RichSourceFunction 函数比 SourceFunction 多了 open 方法(可以用来初始化)和获取应用上下文的方法,那么来了解一下该类,它的类结构如下图所示。
它是一个抽象类,继承自 AbstractRichFunction,实现了 SourceFunction 接口,其子类有三个,如下图所示,两个是抽象类,在此基础上提供了更具体的实现,另一个是 ContinuousFileMonitoringFunction。
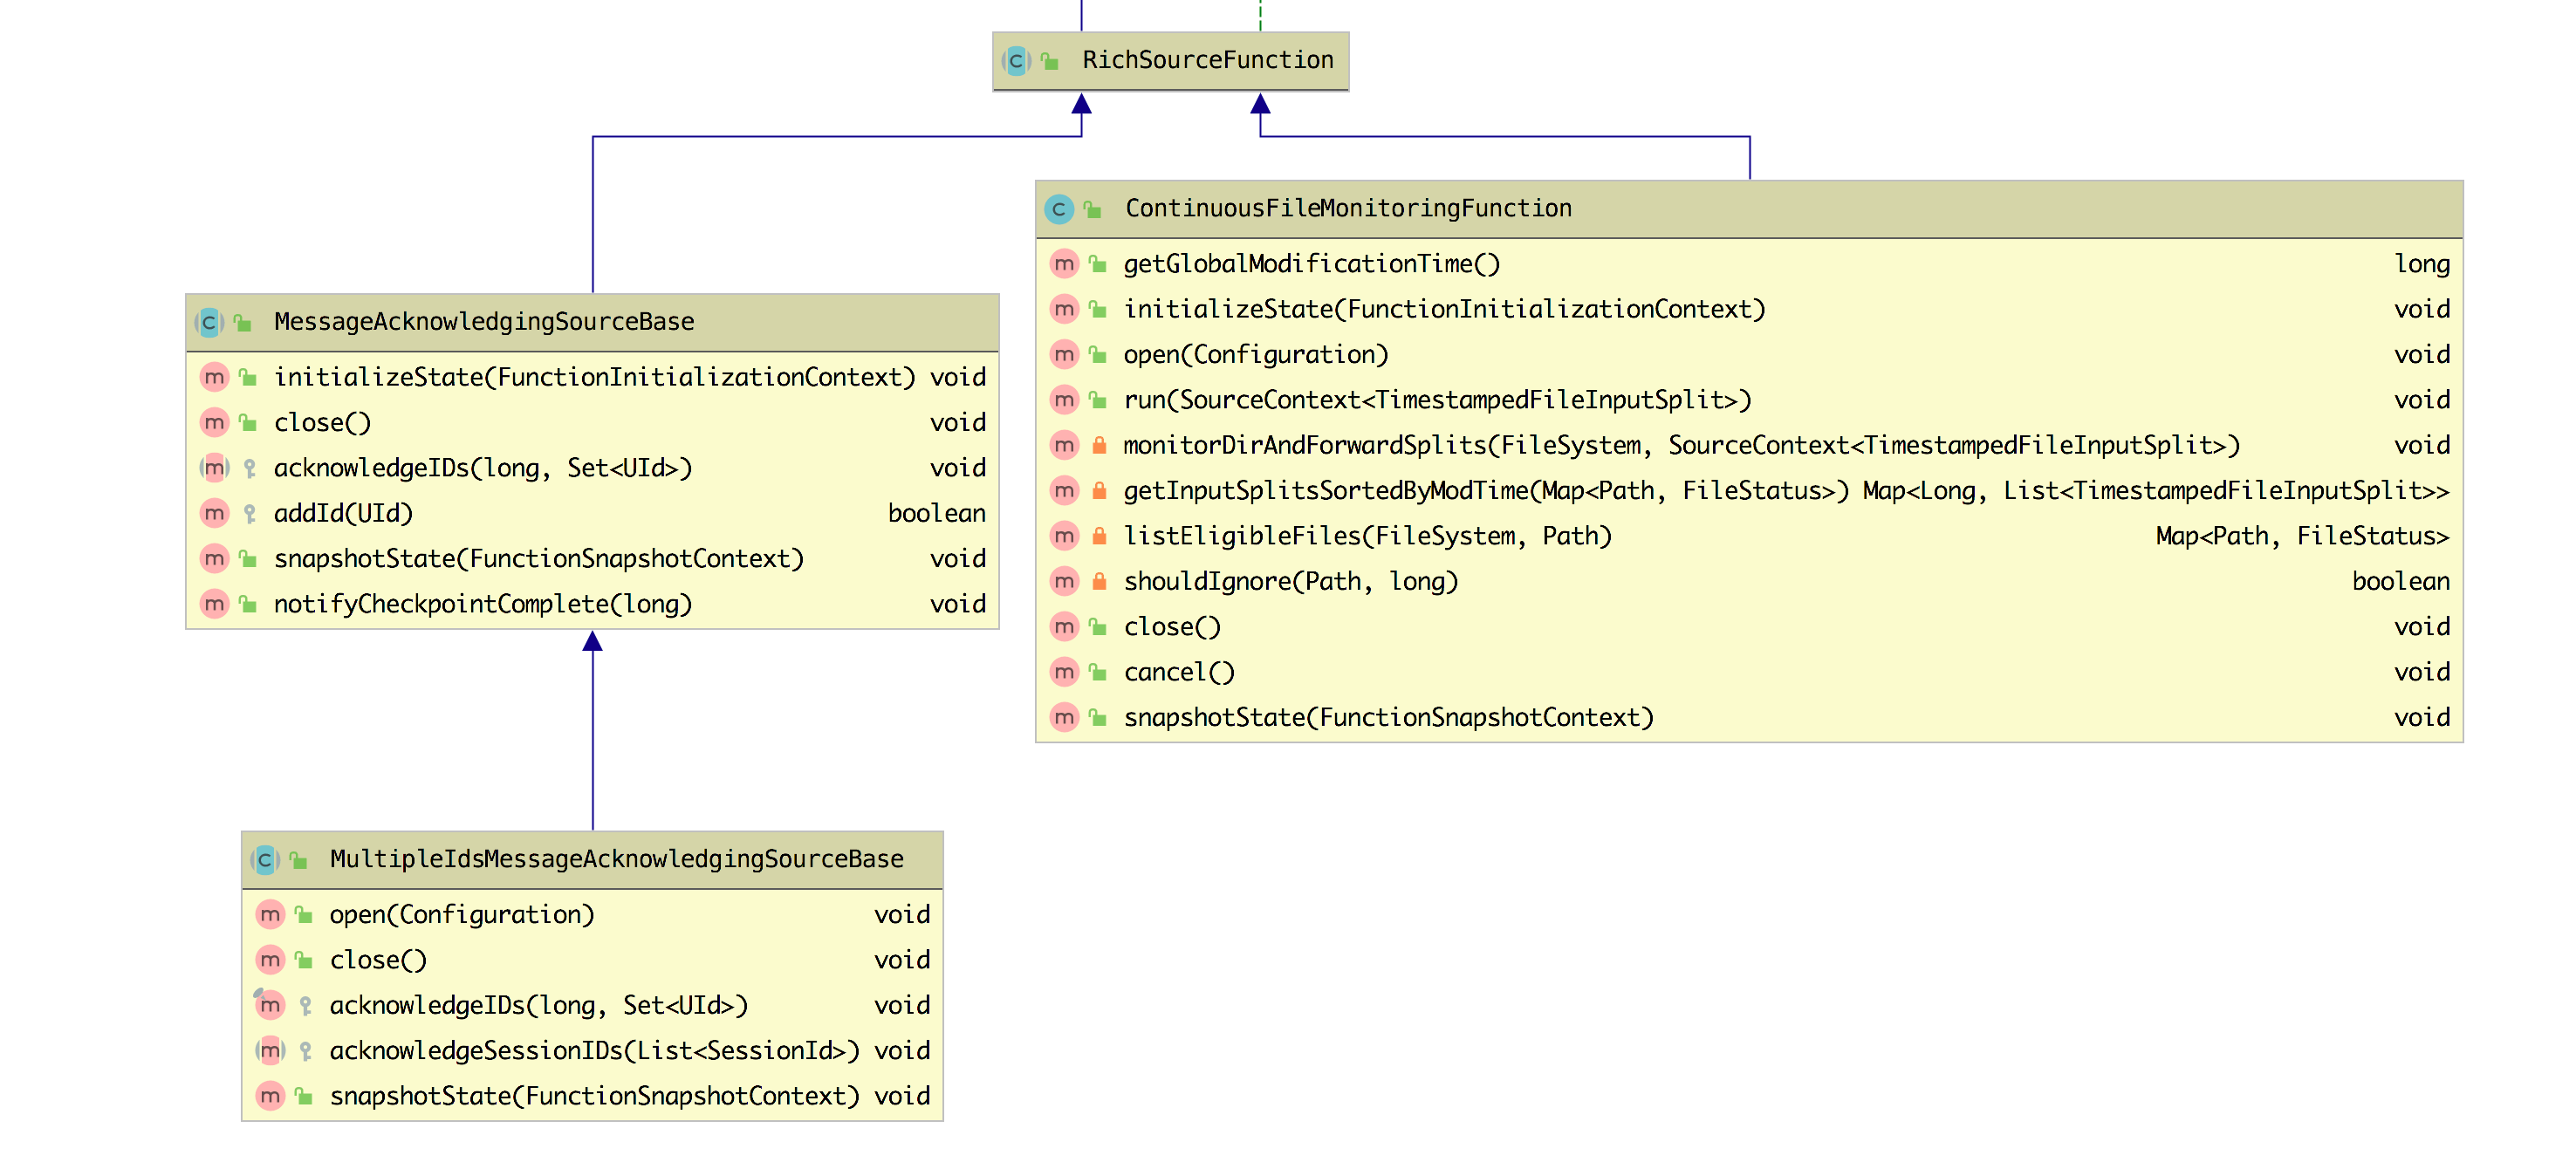
这三个子类的功能如下:
- MessageAcknowledgingSourceBase :它针对的是数据源是消息队列的场景并且提供了基于 ID 的应答机制。
- MultipleIdsMessageAcknowledgingSourceBase : 在 MessageAcknowledgingSourceBase 的基础上针对 ID 应答机制进行了更为细分的处理,支持两种 ID 应答模型:session id 和 unique message id。
- ContinuousFileMonitoringFunction:这是单个(非并行)监视任务,它接受 FileInputFormat,并且根据 FileProcessingMode 和 FilePathFilter,它负责监视用户提供的路径;决定应该进一步读取和处理哪些文件;创建与这些文件对应的 FileInputSplit 拆分,将它们分配给下游任务以进行进一步处理。
除了上面使用 RichSourceFunction 和 SourceFunction 来自定义 Source,还可以继承 RichParallelSourceFunction 抽象类或实现 ParallelSourceFunction 接口来实现自定义 Source 函数。
3.8.3 自定义 Sink Connector
下面将写一个 demo 教大家将从 Kafka Source 的数据 Sink 到 MySQL 中去
工具类
写了一个工具类往 Kafka 的 topic 中发送数据。
1
2
3
4
5
6
7
8
9
10
11
12
13
14
15
16
17
18
19
20
21
22
23
24
25
26
27
|
public class KafkaUtils2 {
public static final String broker_list = "localhost:9092";
public static final String topic = "student";
public static void writeToKafka() throws InterruptedException {
Properties props = new Properties();
props.put("bootstrap.servers", broker_list);
props.put("key.serializer", "org.apache.kafka.common.serialization.StringSerializer");
props.put("value.serializer", "org.apache.kafka.common.serialization.StringSerializer");
KafkaProducer producer = new KafkaProducer<String, String>(props);
for (int i = 1; i <= 100; i++) {
Student student = new Student(i, "zhisheng" + i, "password" + i, 18 + i);
ProducerRecord record = new ProducerRecord<String, String>(topic, null, null, JSON.toJSONString(student));
producer.send(record);
System.out.println("发送数据: " + JSON.toJSONString(student));
}
producer.flush();
}
public static void main(String[] args) throws InterruptedException {
writeToKafka();
}
}
|
SinkToMySQL
该类就是 Sink Function,继承了 RichSinkFunction ,然后重写了里面的方法,在 invoke 方法中将数据插入到 MySQL 中。
1
2
3
4
5
6
7
8
9
10
11
12
13
14
15
16
17
18
19
20
21
22
23
24
25
26
27
28
29
30
31
32
33
34
35
36
37
38
39
40
41
42
43
44
45
46
47
48
49
50
51
52
53
54
55
56
57
58
| public class SinkToMySQL extends RichSinkFunction<Student> {
PreparedStatement ps;
private Connection connection;
@Override
public void open(Configuration parameters) throws Exception {
super.open(parameters);
connection = getConnection();
String sql = "insert into Student(id, name, password, age) values(?, ?, ?, ?);";
ps = this.connection.prepareStatement(sql);
}
@Override
public void close() throws Exception {
super.close();
if (connection != null) {
connection.close();
}
if (ps != null) {
ps.close();
}
}
@Override
public void invoke(Student value, Context context) throws Exception {
ps.setInt(1, value.getId());
ps.setString(2, value.getName());
ps.setString(3, value.getPassword());
ps.setInt(4, value.getAge());
ps.executeUpdate();
}
private static Connection getConnection() {
Connection con = null;
try {
Class.forName("com.mysql.jdbc.Driver");
con = DriverManager.getConnection("jdbc:mysql://localhost:3306/test?useUnicode=true&characterEncoding=UTF-8", "root", "root123456");
} catch (Exception e) {
System.out.println("-----------mysql get connection has exception , msg = "+ e.getMessage());
}
return con;
}
}
|
Flink 程序
这里的 source 是从 Kafka 读取数据的,然后 Flink 从 Kafka 读取到数据(JSON)后用阿里 fastjson 来解析成 Student 对象,然后在 addSink 中使用我们创建的 SinkToMySQL,这样就可以把数据存储到 MySQL 了。
1
2
3
4
5
6
7
8
9
10
11
12
13
14
15
16
17
18
19
20
21
22
23
| public class Main3 {
public static void main(String[] args) throws Exception {
final StreamExecutionEnvironment env = StreamExecutionEnvironment.getExecutionEnvironment();
Properties props = new Properties();
props.put("bootstrap.servers", "localhost:9092");
props.put("zookeeper.connect", "localhost:2181");
props.put("group.id", "metric-group");
props.put("key.deserializer", "org.apache.kafka.common.serialization.StringDeserializer");
props.put("value.deserializer", "org.apache.kafka.common.serialization.StringDeserializer");
props.put("auto.offset.reset", "latest");
SingleOutputStreamOperator<Student> student = env.addSource(new FlinkKafkaConsumer011<>(
"student",
new SimpleStringSchema(),
props)).setParallelism(1)
.map(string -> JSON.parseObject(string, Student.class));
student.addSink(new SinkToMySQL());
env.execute("Flink add sink");
}
}
|
结果
3.8.4 RichSinkFunction 的用法及源码分析
3.8.5 小结与反思
加入知识星球可以看到上面文章:https://t.zsxq.com/Y3RBaaQ
批量写 MySQL 可以参考 :https://t.zsxq.com/FAmYFYJ